- Posted on
- Unique Submission Team
Operations and Quality Management
Accuracy of a machine refers to degree of closeness of actual value and measured value of a system. This can be derived with the help of normal distribution and standard deviation. Control chart assists to monitor process-variable of sample overtime.
Main objective of control chart is to identify special reasons behind variation and reflect this process into data improvement. Furthermore, quality management body is responsible for maintaining internal objectives of a business and focusing on quality policies.
Therefore, an organization needs to modify its QMS in specific, measurable and realistic way. This study is intended to shed light on benefits of ISO9000 and its objectives. Machine accuracy and control chart is also aiming to describe here.
In this case, percentage of shaft= 5.48%
Diameter > 5.032
Machine is set at the average value 5.00 mm.
Normal distribution is approximately symmetric; its mode is very close to centre of a distribution. Moreover, its median, mode and mean are close to each other. For the consequence, shape of normal distribution may be approximated by a smooth bell. It is nearly flat at the top and decreasing inclination more quickly.
This consideration implies that these values are close to mean. Some of the mean values, which are close to each other, occur frequently within the graph, however mean values that are not so frequent, occur in less frequency.
It is vital to note about normal distribution is that the curve is more concentrated at its centre and concentration decreases at the two tails Lychagin et al. (2016, p.012041). It means that data of two tails have fewer tendencies to produce some extreme values.
These values are called outliers. Furthermore, bell curve implies that data is nearly symmetrical. As mentioned by Thomé et al. (2016, p.411), bell curve is dependent on two main factors, such as standard deviation. Here, standard deviation identifies width and height of a bell and mean determines exact position of the centre of bell. In astronomy and physics, normal curve has many properties.
Here, thickness is average 5.00 mm.
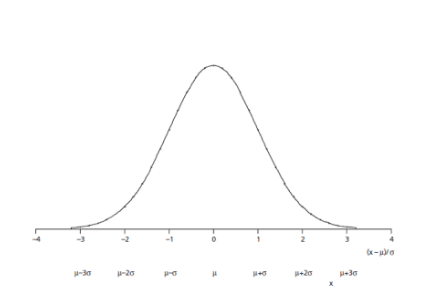
Figure 1: Normal distribution curve
(Source: Influenced by Hitt et al. 2016, p.81)
The company has to manage its process variation within a range 0.12 mm. However, it is willing to produce this shaft with dimension from 4.94 mm to 5.05 mm. Other shaft outside this range will be rejected. If the shaft diameter is in between 10 to 12, its maximum value is 0.16 and minimum value is 0.08. The machine produces about a million shafts within a year. Therefore, the total cost for rejection of shaft is = 1 million * 1p = 1000000 * 1m = 1000000 m.
Additional cost for accurate machine is 60 pound for purchasing. Standard deviation is = 0.016. Accuracy of a machine can be calculated in relation to chemical measurement. In this case, error of machine is difference between measurement value and true value.
Moreover, error can be classified in two types, such as random error and systematic error. As commented by Lychagin et al. (2016, p.012041), systematic error can be found from infinite measurement, which carries out in repeated condition. On the other hand, difference between measurement vale and mean is known as random error.
Therefore, systematic error is a result of defects in analytical method. For this reason, accuracy can be reduced by decreasing systematic error in machine design.
Here, more designs of accurate machine are available. Thus, this machine is profitable for the company.
Process capability is an output of in-control process, which is related to specification of a limit. Through using various capability indices, process capability can be determined. This comparison can be done by finding ratio of two factors, such as spread of processed value and spread of process specification.
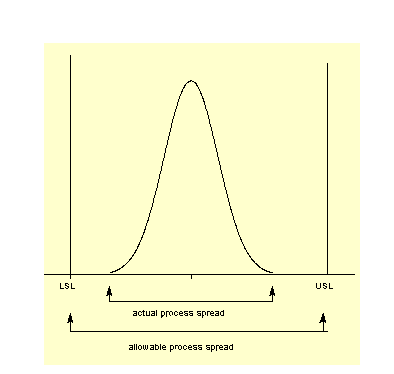
Figure 2: Process specification indices
(Source: Inspired by Cabrerizo et al. p.49)
The process that falls under specification limits is called capable process. Some of the factors need to be mentioned for measuring process capability.
- It provides the long term performance within statistical boundaries.
- It determines the capability of system process, measurement, methods, machine and people as well (Hitt et al. 2016, p.93).
- It may have both sided limit.
Formula for process capability is = (cp, cpk)
Cpk = minimum between cpd and cpl.
At this shaft, process capability is 0.05.
This process is well centered as cpk measures the closeness of target value and performed value.
The control chart types are applied to determine the changes of process over time. Here, data of process are plotted in timely manner. Therefore, control chart types needs to have a central line, which represents its average. Moreover, an upper line represents upper control limits; lower line represents lower control limits.
Control charts are considered as tools of control process, it helps to identify whether the manufacturing process is under control. Furthermore, data obtained by this process can be used for making predictions of further performance. Rastogi and Bharti (2018, p.419) has suggested that control chart has a huge advantage in process changes. In case, control chart indicates that process is under control, it implies that, it is stable. Therefore, in this regard, there is no corrections are required.
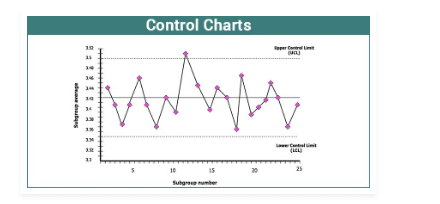
Figure 3: Control chart
(Source: Influenced by Ingason, 2015, p.765)
In order to create a control chart, this is not necessary to be informed about the structure and name of any chart. This is important to select the variables or columns, which are to be charted (Heras-Saizarbitoria and Boiral, 2015, p.319). Additionally, one needs to drag those at respective zone.
There are three variables of control chart, such as X chart, R chart and S chart.
X bar control chart: This kind of control chart helps to plot some samples for monitoring mean of variables. In case of length and width of steel rods or weight of a bag or intensity of a laser beam, control charts are used.
In order to construct this chart, set of samples are needed to be organized in regular intervals. As stated by Heras-Saizarbitoria and Boiral (2015, p.311), it ensures that all samples are graphed and calculated into chart.
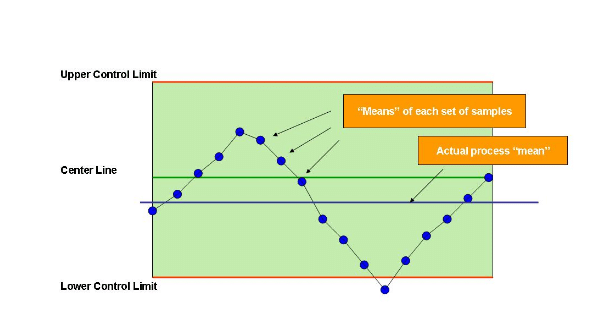
Figure 4: X bar control chart
(Source: Heras-Saizarbitoria and Boiral, 2015, p.319)
R control chart: As mentioned by Rastogi et al. (2018, p.401), this chart assists to demonstrate variability of a process. This range control chart is suitable for a process, which is involved in relatively small sample values. Sample data are recorded from quantity characteristics. Moreover, for every data set, largest and smallest values of differences are recorded. After that, ranges are plotted onto control chart. In this context, centre line represents the average of overall sample values.
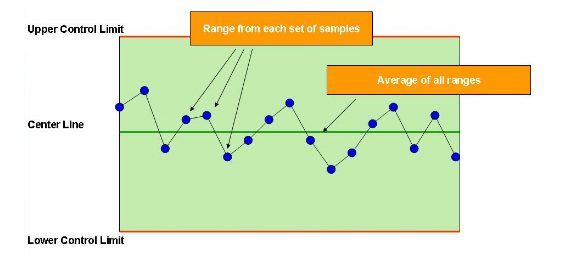
Figure 5: R control chart
(Source: Khudia et al. 2015, p.199)
S control chart: This control chart can be applied for monitoring some variable data. The S chart is suitable for a situation, when there is a large amount of sample values. In this case, S represents standard deviation value of the samples. This is one of the better variation indices.
As argued by Khudia et al. (2015, p.199), in larger data scale, there may occur huge calculation, therefore, it is an advantageous method. Additionally, all the sample data are utilized for determining variation; it has no minimum and maximum value.
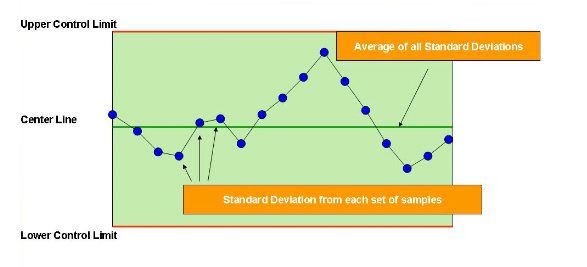
Figure 6: S control chart
(Source: Nemet et al. 2017, p.189)
Advantages and disadvantages of X control chart:
| Advantages | Disadvantages |
● It measures variability of process overtime, thus it is not a static distribution. ● There is no confidence or probability limits, as it provides warning signals if necessary. ● It helps to reduce error margin. ● Visibility of quality data helps to prevent over-tempering. |
● X chart calculates standard deviation and mean of data samples, if those are plotted accurately on chart. ● Sometimes it indicates that process is not under control, which is completely a false alarm. ● In case, limits of control are far away whereas operation can be unaware. |
Table 1: Advantages and disadvantages of X control chart
(Source: Created by learner)
Advantages and disadvantages of Y control chart:
| Advantages | Disadvantages |
● This chart identifies special causes and states users to take corrective action if necessary. ● Moreover, Y chart helps to measure the defects of sample data and the value is responsible for defect. ● For aiding process analysis, it determines performance boundaries. |
● It requires collecting a large amount of data for calculating Y chart. |
Table 2: Advantages and disadvantages of Y control chart
(Source: Created by learner)
Advantages and disadvantages of S control chart:
| Advantages | Disadvantages |
● It can be monitored for more than one characteristic of data. ● Standard deviation is highly skewed. |
● This chart requires larger sample size. ● It cannot determine reason for defect and its corrective actions. |
Table 3: Advantages and disadvantages of S control chart
(Source: Created by learner)
“Working with sample” is a statistical method, which is based on some primary factors, such as observation, hypothesis, prediction and verification. Observation is an approach to identify what is happening with a data set. Moreover, it includes information collection and fact observation progress. In opinion of Nemet et al. (2017, p.189), hypothesis is a procedure that represents some statistical expectations or hunches.
For observing the facts, it has a vital role. In the form of understandable and comprehensible, hypothesis can be identified. Similarly, prediction is an approach, which is based on some anticipatory deductions. This helps to improve the stage of analysis. Data prediction may be in the form of numerical or intuitive. At final stage, verification is necessary to determine reliability of collected data and its result.
Error in measurement or observation is a result of device defects, erroneous or incomplete data and inappropriate diagnostic procedure. Moreover, there may have some problems in designing questionnaires in which quality of measurement determines validity of study. Therefore, finding error in measurement is necessary to improve data collection activities.
Working with sample can provide an unbiased result. It may be interrupted in any time, which does not effect on data. Additionally, sampling method is less time consuming and relatively economical.
This process is suitable for examining the machine utilization progress and work performance through direct observation. Therefore, it is useful to determine proportion of idleness or delay of a machine. The below mentioned factors show that sampling method is better than single measurement.
- Distinction between idle time and working time can be estimated by sampling. However, a single measurement may not be reliable.
- Standards of single measurement are egalitarian than various subjective standards. Its value may be influenced by sample biases. On the other hand, as observations or measurements are taken at random intervals, it provides an accurate result. Moreover, outcomes cannot be influenced or twisted by any factors.
Control chart is applied to identify the variation of counting attributed data. Moreover, this helps to estimate variation of defects within a constant group size. Group size refers to area of examination. In this context, C control chart is used to measure the defects in a motherboard. Steps to find C chart are mentioned as below.
- Data collection
- Data plotting onto chart
- Calculation of process average
- Calculation of control limits
- Interpretation of chart
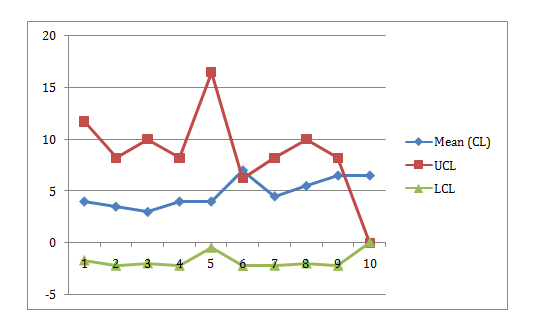
Figure 7: Graphical representation of UCL and LCL
(Source: Created by learner)
An organization is always needed to have the ISO 9000 standards, as it is certified by some independent parties such as certification body. Quality of a company strives for time that is quite difficult to achieve.
Complications of this certification concern about quality and efficiency of business. Various companies offer services and products that put forward its success. With the help of ISO9000 certification, organization can identify the root of any problem, which assists to resolve internal business problems such as quality issues.
Through improving organizational efficiency, the company can maximize its profitability. There are various benefits for choosing ISO 9000 registration, which are mentioned as below.
Increase customer satisfaction: Through securing and seeking ISO9000 registration, the company can gain supplier’s dedication for maintaining quality.
Improve image and credibility: As ISO9000 is one of the internationally recognized standards, it is the basis for establishing quality management of an organization. According to almost all observers, this quality management provides a significant credibility in prospective and current market.
As noted by Choudhary and Maheshwari (2016, p. 59), it proves that business management is fully dedicated to provide quality service to customers. In case of the organization is endeavoring lucrative customers or negotiating with long-term customers, this certification helps to increase value in international market.
Reduces operational expenses:
In rigorous registration procedure, often cache plays a crucial role. This QMS helps companies to increase efficiency that reduce waste of money and time of garners.
Advanced management control: This process requires various self assessment documents. Therefore, the company can comprehend overall process and direction of business.
Improve internal communication: This process emphasize on operational management issues and self-analysis. Thus, faculties of organization can interact with one another. As influenced by Lychagin et al. (2016, p.012031), this helps to understand expectations and needs of internal customers.
Reduces risk in production liability: Business experts consider that ISO9000 registered organization are not likely to get into liability lawsuits. Consequently, they continuously maintain their quality of business.
The company has been taken decision to get registration of ISO9000. Thus, this is vital to follow some stages for certification, which are mentioned below.
- Gain knowledge about ISO9000
- Get commitment from top management
- Perform company’s gap analysis
- Train personnel
- Develop project plan
- Prepare manuals for quality policy
- Prepare procedures of operation
- Hold the internal audit
- Select proper register
- Improve QMS
- Go through overall registration procedure
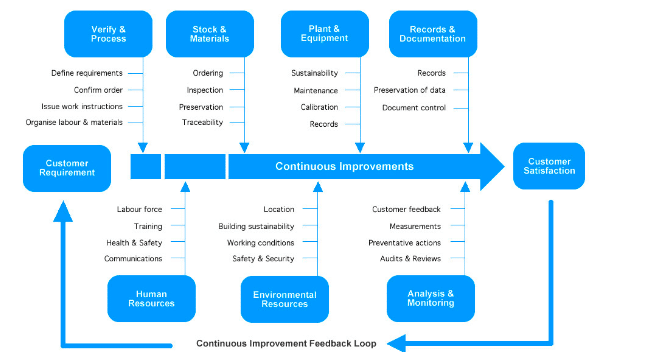
- Obtain ISO9000 certification [Refer to appendix]
There is a range of terms related to ISO9000 registration, such as quality management system, quality policy, top management and quality objectives.
Management system: Top management body is involved in establishing objectives and policies, which are to be achieved. This body can include environmental system, financial system and others.
Therefore, management system has the responsibility to comply with all requirements and regulations related to business operation. Moreover, standards of management system provide state-of-the-art and other international models, which are vital for any organization.
QMS: This refers to a group of some significant business processes. These business procedures are made by focusing on quality policy and objectives. Process-based QMS is an effective approach to monitor all quality policies ISO regulations. As suggested by Ingason, (2015, p.193), output of one business process is the input of another process. Therefore, these factors are intercorrelated.
It can be concluded from the above study that measurement of machine accuracy depends on error analysis and process capability. There are two types of errors involved in a system, such as systematic error and random error. This is necessary to follow some terms and conditions of ISO9000 registration, which helps to improve overall business performance and reduce risk in production liability.
Moreover, there is a significant interrelation among QMS, quality objectives, policy and top management system. An organization needs to maintain internal business environment by this certification. Therefore, it is crucial to adopt ISO9000 certification for improving its image and credibility.
Cabrerizo, F.J., Morente-Molinera, J.A., Pérez, I.J., López-Gijón, J. and Herrera-Viedma, E., 2015. A decision support system to develop a quality management in academic digital libraries. Information Sciences, 323, pp.48-58. Available at: https://sci2s.ugr.es/sites/default/files/ficherosPublicaciones/1931_INF-SCI-2015-323-48-58.pdf Accessed on: 15th July, 2019
Choudhary, A. and Maheshwari, S., 2016. Quality Management (ISO 9000) in 3 Food and Construction Material SME’s at Indore-A Case Study. Journal of Advanced Research in Production and Industrial Engineering, 3(2), pp.53-60. Available at: http://adrjournalshouse.com/index.php/production-industry-engineering/article/download/202/255 Accessed on: 15th July, 2019
Heras-Saizarbitoria, I. and Boiral, O., 2015. Symbolic adoption of ISO 9000 in small and medium-sized enterprises: The role of internal contingencies. International Small Business Journal, 33(3), pp.299-320. Available at: https://www.researchgate.net/profile/Olivier_Boiral/publication/256058190_Symbolic_adoption_of_ISO_9000_in_small_and_medium-sized_enterprises_The_role_of_internal_contingencies/links/5a9318b645851535bcd9381e/Symbolic-adoption-of-ISO-9000-in-small-and-medium-sized-enterprises-The-role-of-internal-contingencies.pdf Accessed on: 15th July, 2019
Hitt, M.A., Xu, K. and Carnes, C.M., 2016. Resource based theory in operations management research. Journal of Operations Management, 41, pp.77-94. Available at: https://www.researchgate.net/profile/Christina_Carnes/publication/274063973_Resource_Based_Theory_in_Operations_Management_Research/links/5c2fae2592851c22a359bfa2/Resource-Based-Theory-in-Operations-Management-Research.pdf Accessed on: 15th July, 2019
Ingason, H.T., 2015. Best project management practices in the implementation of an ISO 9001 quality management system. Procedia-Social and Behavioral Sciences, 194, pp.192-200. Available at: https://www.sciencedirect.com/science/article/pii/S1877042815036125/pdf?md5=6fed2636db6b9cd41caff2d2b9c420c8&isDTMRedir=Y&pid=1-s2.0-S1877042815036125-main.pdf Accessed on: 15th July, 2019
Khudia, D.S., Zamirai, B., Samadi, M. and Mahlke, S., 2015, June. Rumba: An online quality management system for approximate computing. In 2015 ACM/IEEE 42nd Annual International Symposium on Computer Architecture (ISCA) (pp. 554-566). IEEE. Available at: http://cccp.eecs.umich.edu/papers/dskhudia-isca15.pdf Accessed on: 15th July, 2019
Lychagin, D.V., Lasukov, A.A., Walter, A.V. and Arkhipova, D.A., 2016, April. Systematic classifier of manufacturing processes for medium size shafts. In IOP Conference Series: Materials Science and Engineering (Vol. 125, No. 1, p. 012030). IOP Publishing. Available at: https://iopscience.iop.org/article/10.1088/1757-899X/125/1/012030/pdf Accessed on: 15th July, 2019
Nemet, Y. and Brand, E., Varcode Ltd, 2017. System and method for improved quality management in a product logistic chain. U.S. Patent 9,646,277. Available at: https://patentimages.storage.googleapis.com/b8/cd/87/80235e88e7ca0a/US9646277.pdf Accessed on: 15th July, 2019
Rastogi, N. and Bharti, M., 2018. An Introduction OF ISO 9000-9001Certification. Multidisciplinary Higher Education, Research, Dynamics & Concepts: Opportunities & Challenges For Sustainable Development (ISBN 978-93-87662-12-4), 1(1), pp.398-402. Available at: http://conference.nrjp.co.in/index.php/MHERDC/article/download/69/69 Accessed on: 15th July, 2019
Thomé, A.M.T., Scavarda, L.F. and Scavarda, A.J., 2016. Conducting systematic literature review in operations management. Production Planning & Control, 27(5), pp.408-420. Available at: https://www.researchgate.net/profile/Antonio_Marcio_Thome/publication/290210136_Conducting_systematic_literature_review_in_operations_management/links/58c19042a6fdcce648da9de8/Conducting-systematic-literature-review-in-operations-management.pdf Accessed on: 15th July, 2019
Appendix: Process of ISO registration
(Source: https://isocertificationbody.wordpress.com/2015/03/30/iso-9001-certification/)


