
This Project is about extracting just the files that haven’t been deleted from an Image
Task 1
Hand-On Exercise 1-4
This project is about extracting just the files that haven’t been deleted from an image.

The first step is to load the file image into the ProDiscovery Basic software.
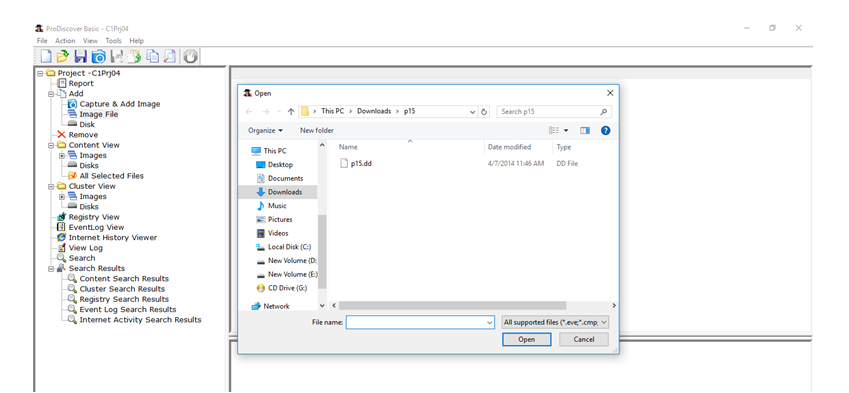
The image file in this sample is p15.dd
This is selected by going tothetree view and clicking Add and then clicking Image File.
Then in the tree view, content view s selected and Images are expanded. A path name appears on the screen which is clicked again. This displays the files in the working area.

 The column Deleted is selected to sort the files as Yes or NO files and the No files are saved separately one by one as given below:
Hands-on 1-6
In this exercise, the aim is to search for the keywords ANTONIO, HUGH EVANS and HORATIO in the given data image of the USB drive.
To do so first the data image is added to the ProDiscover Basic project. In the content view the data is listed as given below:
The search toolbar button is used to search the specified keywords as shown below:
The search result returns the searched data as the answer to the search query as given below: here a sample data p15 is used and bill keyword is searched in the search box. Following output shows that a file name bill-of-rights is returned by the search query. Thus, through this way keywords can be searched from the image file of the drive.
Hands-On 4.3
This exercise investigates the Terry USB drive to be sure that Terry is not involved in any wrong work against the company policy. To do so OS Forensic tool is used and a case is created and a case name is given. Then investigate disk from another machine is selected. Following screen displays these steps:
Now the device to be investigated is selected as given below:
Then the Terry-Work-USB-2009-12-11.Eo1 is selected. Then a partition is selected. After the partition is selected for the image file click open the file terry-work-USB-2009-12-11.E01 in the file browser window as shown below:
Now using search string text box the keyword is searched and an index is created. Once the index is created the file types are listed and then Charlie’s USB image is removed from the list box.
Finally, the terry USB is clicked open and the device contents are examined as shown below: (Nelson et al. 2014).
Hands-On 4.6
This is a project that calculates the hash value of the file on a USB drive. Any change in the file content shall result in the change in the hash value and thus can be used to compare the files.
A text file is created with a message and stored in the USB drive. FTK image is installed and the logical drive is selected as the source drive. This is shown below:
The hash1.txt file is displayed in the message bar of the FTK Imager. Right click on the hash1.txt file and then selecting Export File Hash list saves the hash value of the message as a.csv file.
Now the hash1.txt file is changed by adding a letter to the end of the message content of the file and the hash value is recomputed.
The hash value of theoriginal file is given below:
The hash file of the changed file is given below:(Bem& Huebner,2007).
Task 2
Acquiring the image of the disk of a Linux OS based computer from a crime scene such that the computer cannot be removed from the crime scene:
Option 1:
In order to acquire the image of the disk of Linux OS based computer, simply turning on the system can destroy the data. Thus it is advisable to remove the hard drive from the computer and connect it to some other system through the process of hardware write blocker and then get the image using dcflddcommand.
The things required are a forensic Linux Live CD capable of mounting and reading the drives, an external drive with cables or a USB and a FireWire.
Connect the external drive or USB with FAT 32 disk of the suspect computer and boot it using Linux Live CD and turn the external drive on. Then start the shell prompt and switch to the super user mode. The connection to the other external drive is done using write blocker so that any accidental write to the device will be blocked and thus may not alter the evidence. After entering the root password use fdisk-1 to list all the devices connected to the system. Then create a mount point for the external drive or the USB and the FireWire in /mnt directory using mkdir/mnt/sda5 command. After mounting the drive create a directory on the target drive so as to receive the image of the drive through mkdir casenumber01 (Bem& Huebner,2007).
Then format a raw format image using dcfldd command and for bigger sized drives split the drive by creating segments as given in command below:
dcfldd if=/dev/sda split=2M of=usbimg hash=md5
Through this command, the MD5 value of the acquired data is also displayed. Finally, dismount the target drive using unmounts command (Nelson et al. 2014).
Option 2:
The other option for acquiring the image of the original data is to have a regular backup using
# tar -cvJf –exclude={‘/proc/*’,’/sys/*’,’/tmp/*’} \
/path/to/external/medium/rest.tar.xz /
Through this, the hidden partitions won’t be discoverable but every file accessible from the root of the system shall be decrypted.
Task 3
The process of sending some hidden messages in the graphical images or text is known as steganography. Through this method, only the receiver and sender are aware that a message is sent and thus can send secure messages (Kessler, 2015).
The general image files are of the same size as to that of stenographic image files and look the same when viewed in any image viewer. But when MD5 or any hash comparison is carried out on these images then the hash values of these files are not equal. Thus, to identify the stenographic image the best option is to carry out hash comparison for both images (Kessler, 2015).

The steganography process first requires a message to be hidden in the message so first a message is selected. Then using many software’s like S-Tools, tte etc. the message is stored in the image file in the encrypted form. It then asks for a password, and then after clicking hide message button, the message is hidden. The hidden message along with the image is sent to the receiver, who is aware of the password. The receiver can use the password to decrypt the message from the image (Kessler, 2015).
Now in order to detect steganography from the email messages, tools like stegasniff can be used. These tools invoke a packet sniffer to listen to the traffic of SMTP port and capture the packets coming and going to this port and store them in a system buffer. The JPEG image attachment is decoded and saved and sent to the Steganography analyzer which uses the JPEG image and uses stegno analysis methods like histogram analysis, or using reverse engineering create a non-stenographic image of the stenographic file (Kessler, 2015).
Steganography methods hide the message by manipulating the color order and thus cause structural changes. These changes in the structural signature can be examined using Steagbreak tools and thus can identify the steganography message.
Tools like Gargoyle can be used to detect the steganography in the images. This software makes use of a data set as a hash set and compares them with the input email images. It then also can be used to further define the cryptography method used and thus can tell more details about the image. Then Stegdetect can be used to decipher the hidden message from the images.
References
Bem, D., & Huebner, E. (2007).Computer forensic analysis in a virtual environment.International journal of digital evidence, 6(2), 1-13.
Kessler, G. C. (2015). An Overview of Steganography for the Computer Forensics Examiner (Updated Version, February 2015).
Nelson, B., Phillips, A., &Steuart, C. (2014).Guide to computer forensics and investigations.Cengage Learning.
